Group the data by program units
|
Use the Timeline grouping menu to select a grouping level:
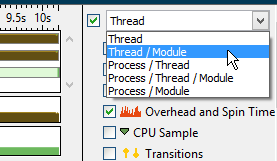
A grouping level depends on the analysis type. Selected grouping affects the metrics provided in the Timeline pane. If some of the metrics are not supported for the selected grouping, this data does not show up in the Timeline view and the legend is updated accordingly.
|
Sort the data
|
Right-click the list of threads/cores/CPUs (depending on the analysis type) and select the required type of sorting from the Sort By content menu option:
Use This
|
To Do This
|
|---|
Row Start Time
|
Sort the rows by the thread creation time.
|
Row Label
|
Sort the rows alphabetically.
|
<Metric>
|
Sort the rows by performance metric monitored for the selected viewpoint, for example, CPU Time, Hardware Event Count, and others.
|
Ascending
|
Sort the program units in the ascending order by one of the categories selected above.
|
Descending
|
Sort the program units in the descending order by one of the categories selected above.
|
|
Re-order the rows
|
Select the row you need, hold and drag it to the required position. Press SHIFT to select multiple adjacent rows. Press CTRL to select multiple disjointed rows.
|
Filter data
|
Select the required program unit(s), right-click and choose from the context menu to filter in or filter out the data in the view by the selected items. To go back to the default view, select the Remove All Filters option.
|
Select particular ranges/objects for analysis
|
Drag and drop to select a time range for analysis (default). Press SHIFT and drag a rectangle to select objects (context switches, tasks, frames, and others) on the timeline. You may interchange the default behavior via the context menu option Use Shift for Object Selection. To add new objects to a selection or de-select already selected objects, press CTRL.
|
Zoom in and focus on a particular graph section
|
Drag and drop to select the range of interest.
Right-click and select Zoom In on Selection from the context menu.
To restore the timeline to the previous state, right-click and select Undo Previous Zoom Selection. To restore the timeline to the entire time interval (for example, after multiple zooming operations), right-click and select Reset Zoom from the context menu or click the  Reset Zoom button on the timeline toolbar.
|
Zoom in/Zoom out the timeline
|
Click the  Zoom In/  Zoom Out buttons on the timeline toolbar.
|
Change the height of the row
|
Right-click and select the Change Band Height option from the Timeline context menu and select the required mode:
Use This
|
To Do This
|
|---|
Super Tiny
|
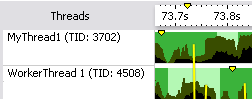
Fit all available rows (corresponding to program units such as processes, threads, and so on) into the timeline area and display metric data in a gradient fill. This mode is especially useful for results with multiple processes/threads since it shows all the data in a compact way ("bird's-eye view") with no scroll bar. It helps observe large numbers that are typical for high-end parallel applications targeted, for example, for Intel® Xeon Phi™ coprocessors, and easily recognize application phases and places of underutilization for further zooming/filtering.
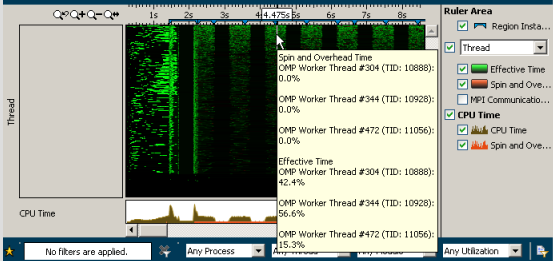
If there are more rows than pixels, then multiple rows can share a pixel, in which case the pixel shows the maximum value. If you hover over a chart object, the tooltip shows all of the rows assigned to a pixel separately. If you resize the window, the timeline view is re-drawn and pixels are re-shared.
If there is data, the active ranges are colored: the more data associated with a pixel, the more intense color is used for drawing. Otherwise, the band is shown in a black background color.
For hierarchical data, the Super Tiny mode shows timeline data for the last level of hierarchy aggregated by the upper levels. For example, for the Process/Thread grouping you see threads data aggregated by process. Hover over a chart element to view the full hierarchy listed in the tooltip.
NoteThe Super Tiny display mode is available only for the viewpoints including the CPU Effective Time metric.
|
Tiny
|
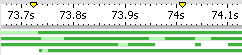
Set the small row height (about 6px).
This mode shows limited charts: if there is data, the active ranges are colored; otherwise, the band is shown in a regular background color.
This mode does not show time markers, row identification (threads), and transitions. Rows cannot be reordered.
|
Normal
|
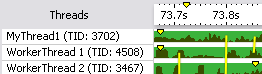
Set the normal row height (about 16-18px). This mode shows charts, time markers, row identification (threads), and transitions. Rows can be reordered.
|
Rich
|
Set the maximum row height (35-50px). This mode shows charts, charts for nested tasks, time markers, row identification (threads), and transitions. Rows can be reordered and their height can be manually adjusted.
|
|
Change the measurement units on the time scale
|
Right-click, select the Show Time Scale As context menu option, and choose from the following values:
Elapsed Time (default)
OS Timestamp
CPU Timestamp
|
Open the source view
|
Double-click the required transition/wait. The Intel® VTune™ Amplifier
opens the Source or, if symbol information is not available, Assembly pane and highlights the corresponding waiting/signaling call site.
|
Synchronize the selection with other panes
|
Select a thread/module of your interest. VTune Amplifier automatically highlights the program units (for example, functions) corresponding to the selected item in the Bottom-up and Top-down Tree panes.
|