To access the standalone interface of the Intel® VTune™ Amplifier, do one of the following:
|
To access VTune Amplifier XE: |
To access VTune Amplifier for Systems: |
|---|---|
|
Run the amplxe-gui script from <install_dir>/bin32 or <install_dir>/bin64, where <install_dir> is /opt/intel/vtune_amplifier_xe_2016. From OS X* system, start Intel VTune Amplifier XE 2016 from the Launchpad. |
Run the amplxe-gui script from <install_dir>/bin32 or <install_dir>/bin64, where <install_dir> is /opt/intel/system_studio_2016/vtune_amplifier_for_systems From OS X* system, start Intel VTune Amplifier 2016 for Systems from the Launchpad. NoteYou can also launch the VTune Amplifier for Systems from the Eclipse* IDE. |
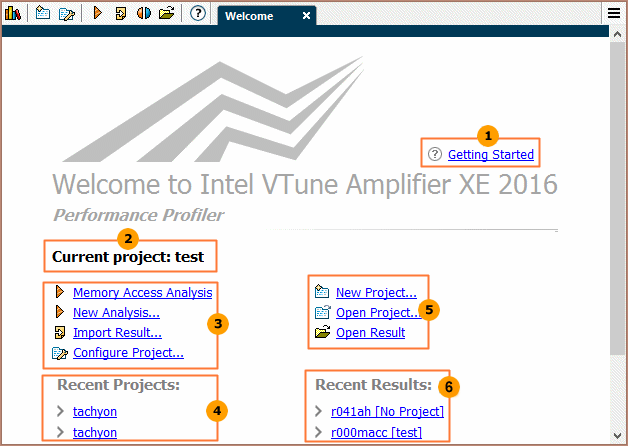
By default, the VTune Amplifier opens a Welcome page that provides hints on your next steps and links to necessary options. For example, for the VTune Amplifier XE:
|
Click the Getting Started link to open a reference page providing links to the most important local and online documentation resources and code samples. For the VTune Amplifier for Systems, you may also click the Energy Profiler Workflow link to quickly access the information on basic steps to run the Energy Analysis for remote Linux*, Android*, or Windows* targets. |
|
|
To start with the VTune Amplifier, you need to have a project that specifies an application to analyze. If a project is open, its name shows up on the Welcome page as the Current project. |
|
|
When a project is open, you may quickly re-run a recently used analysis configuration by clicking its name in the list. To configure and run a new configuration, click the New Analysis... link. To import a result into an existing project, click Import Result.... To configure target and analysis settings for a currently opened project, click Configure Project.... |
|
|
For quick and easy access to an existing project used recently, click the required project name in the Recent Projects list. Hover over a project name in the list to see the full path to the project file. The name of the currently opened project is displayed in the window caption. When the project is open, you can run a new data collection for the specified target application or explore/compare existing data collection results. |
|
|
Click the New Project... link to create a new project, or click Open Project... to open an existing project (*.amplxeproj). Click Open Result to open a result file (*.amplxe). |
|
|
To open a recently collected result, click the required item in the Recent Results list. By default, each result name has an identifier of its analysis type (last two letters in the result name); for example, cc stands for Concurrency analysis. Hover over a result name in the list to see the full path to the result file. |


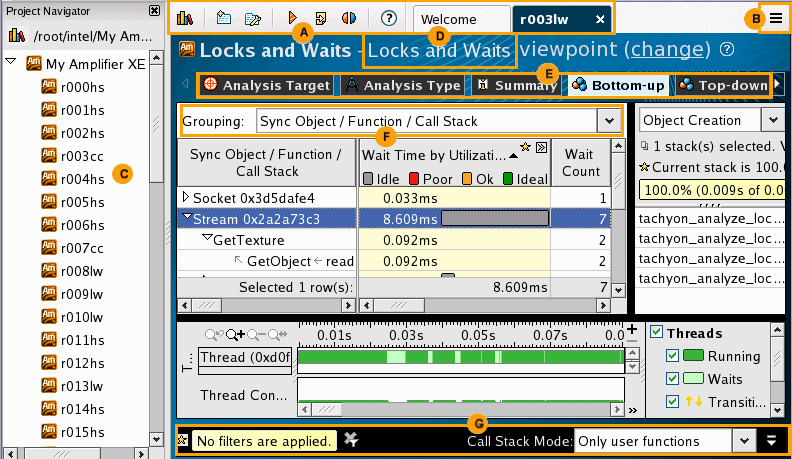
When a VTune Amplifier project is created, you may explore basic product mechanisms that help you analyze data:
|
Use the toolbar to configure and control result collection. Click the
|
|
|
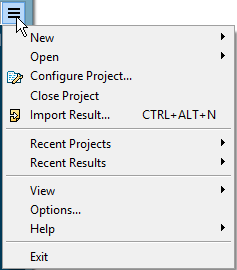
Use the VTune Amplifier menu to control result collection, define and view project properties, and set various options: |
|
|
Use the Project Navigator to manage the project and collected analysis results. |
|
|
Click the (change) link to select a viewpoint, a preset configuration of windows/panes for an analysis result. For each analysis type, you can switch among several viewpoints to focus on particular performance metrics. |
|
|
Switch between window tabs to explore the analysis type configuration options and collected data provided by the selected viewpoint. |
|
|
Use the Grouping drop-down menu to choose a granularity level for grouping data in the grid. |
|
|
Use the filter toolbar to filter out the result data according to the selected categories. |

 button to open/close the Project Navigator. Use the VTune Amplifier result tabs to manage result data. You can click the
Configure Project toolbar button to view or change the result file location.



Running amplxe-gui from Command Line
You may run the VTune Amplifier (amplxe-gui) from the command line as follows:
-
Locate the directory where the amplxe-vars script file was installed. If you accepted the default location when installing the VTune Amplifier, the location is /opt/intel/vtune_amplifier_xe_2016 for VTune Amplifier XE and /opt/intel/system_studio_2016/vtune_amplifier_for_systems for VTune Amplifier for Systems.
-
Open a command window and type the following source command to execute the script file: source <install-dir>/amplxe-vars.sh.
The script file displays the product name and the build number. You can now use the amplxe-cl and amplxe-gui commands as well as display the amplxe-cl(1) man page.
-
Run the standalone graphical interface of the VTune Amplifier as follows:
> amplxe-gui <path>
where <path> is one of the following:
For example, to open the tachyon project, run:
> amplxe-gui root/intel/ampl/projects/tachyon/config.amplxeproj